

Table of contents
Are you a novice programmer looking to enhance your coding experience and efficiently streamline data analysis projects? Picture this: you're navigating through intricate lines of code, compiling insights, and visualizing data seamlessly in one comprehensive platform. That brings about Jupyter Notebooks – a versatile tool that simplifies your coding journey and elevates your programming proficiency.
In this guide, we'll delve into the fundamental aspects of Jupyter Notebooks, empowering you to unleash its full potential. Let's address the common pain points beginners encounter and provide you with actionable tips and best practices to navigate this dynamic workspace effectively.
Discover the essence of Jupyter Notebooks as we unravel the basics, offer installation guidance, and equip you with insider tricks to optimize your workflow. Get ready to embark on a transformative coding journey with Jupyter Notebooks at your side, empowering you to excel in your projects effortlessly.
What is a Jupyter Notebook?
A Jupyter Notebook is an open-source web application that allows you to create and share documents containing live code, equations, visualizations, and narrative text. It's widely used for data analysis, scientific research, and machine learning projects, among other applications. Jupyter Notebooks support over 40 programming languages, including Python, R, and Julia. The name "Jupyter" refers to its core languages: Julia, Python, and R, but today, it extends far beyond these.
Here are some key features that make Jupyter Notebooks particularly powerful and popular:
Interactive Coding: Code can be written and executed in chunks, known as "cells," allowing for interactive development and experimentation. This feature is especially beneficial for data exploration, visualization, and iterative coding tasks.
Rich Text Elements: Beyond just code, notebooks can contain markdown, HTML, images, and LaTeX equations, allowing for rich, explanatory documentation of the code and its purpose. This makes it an excellent tool for educational purposes and for sharing comprehensive reports with others.
Visualization: Jupyter Notebooks integrate seamlessly with data visualization libraries like Matplotlib, Seaborn, and Plotly, enabling the creation of interactive or static graphs directly within the notebooks.
Language Support: Initially designed for Python, it now supports many languages using "kernels" — processes that run interactive code in a particular programming language. There are kernels available for Python, R, Julia, and over 40 other languages.
Extensibility and Flexibility: A wide range of extensions add functionality to Jupyter Notebooks, such as widgets that provide sliders, buttons, visual displays, and tools for version control and workflow management.
Shareability: Notebooks can be shared easily as HTML, PDF, or through Jupyter Notebook Viewer web pages, making it simple to share insights, research, or tutorials with a broader audience.
Why Use Jupyter Notebooks?
Interactive Development: Jupyter Notebooks offer an interactive environment where you can execute code in blocks (or cells) and see the results immediately. This feature is particularly useful for data exploration and visualization.
Documentation and Sharing: With the ability to include narrative text alongside your code, Jupyter Notebooks are excellent for documenting your development process and sharing your methodology and results with others.
Support for Multiple Languages: Although initially designed for Python, Jupyter Notebooks now support various programming languages, making them a versatile tool for many projects.
Integration with Data Science and Machine Learning Tools: Jupyter Notebooks integrate seamlessly with popular data science libraries such as NumPy, Pandas, and Matplotlib, as well as machine learning frameworks like TensorFlow and PyTorch.
Getting Started with Jupyter Notebooks
To get started with Jupyter Notebooks, you'll need to install it first. The easiest way to install Jupyter Notebooks is by installing the Anaconda Distribution, which includes Jupyter and other useful data science tools:
Step 1: Choose Your Installation Method
Option 1: Installing via Anaconda (Recommended for Beginners)
Anaconda is a free, open-source distribution of Python and R that simplifies package management and deployment. It comes with Jupyter Notebooks and many other useful data science tools pre-installed.
Download Anaconda:
Visit the Anaconda download page.
Choose the installer appropriate for your operating system (Windows, macOS, or Linux).
Download the installer.
Install Anaconda:
Run the downloaded installer.
Follow the on-screen instructions. It's usually safe to go with the default installation settings. Check the option that says "Add Anaconda to my PATH environment variable" or similar to ensure you can run Anaconda from your command line.
Launch Jupyter Notebook:
Open your command line or terminal.
Type jupyter notebook and press Enter.
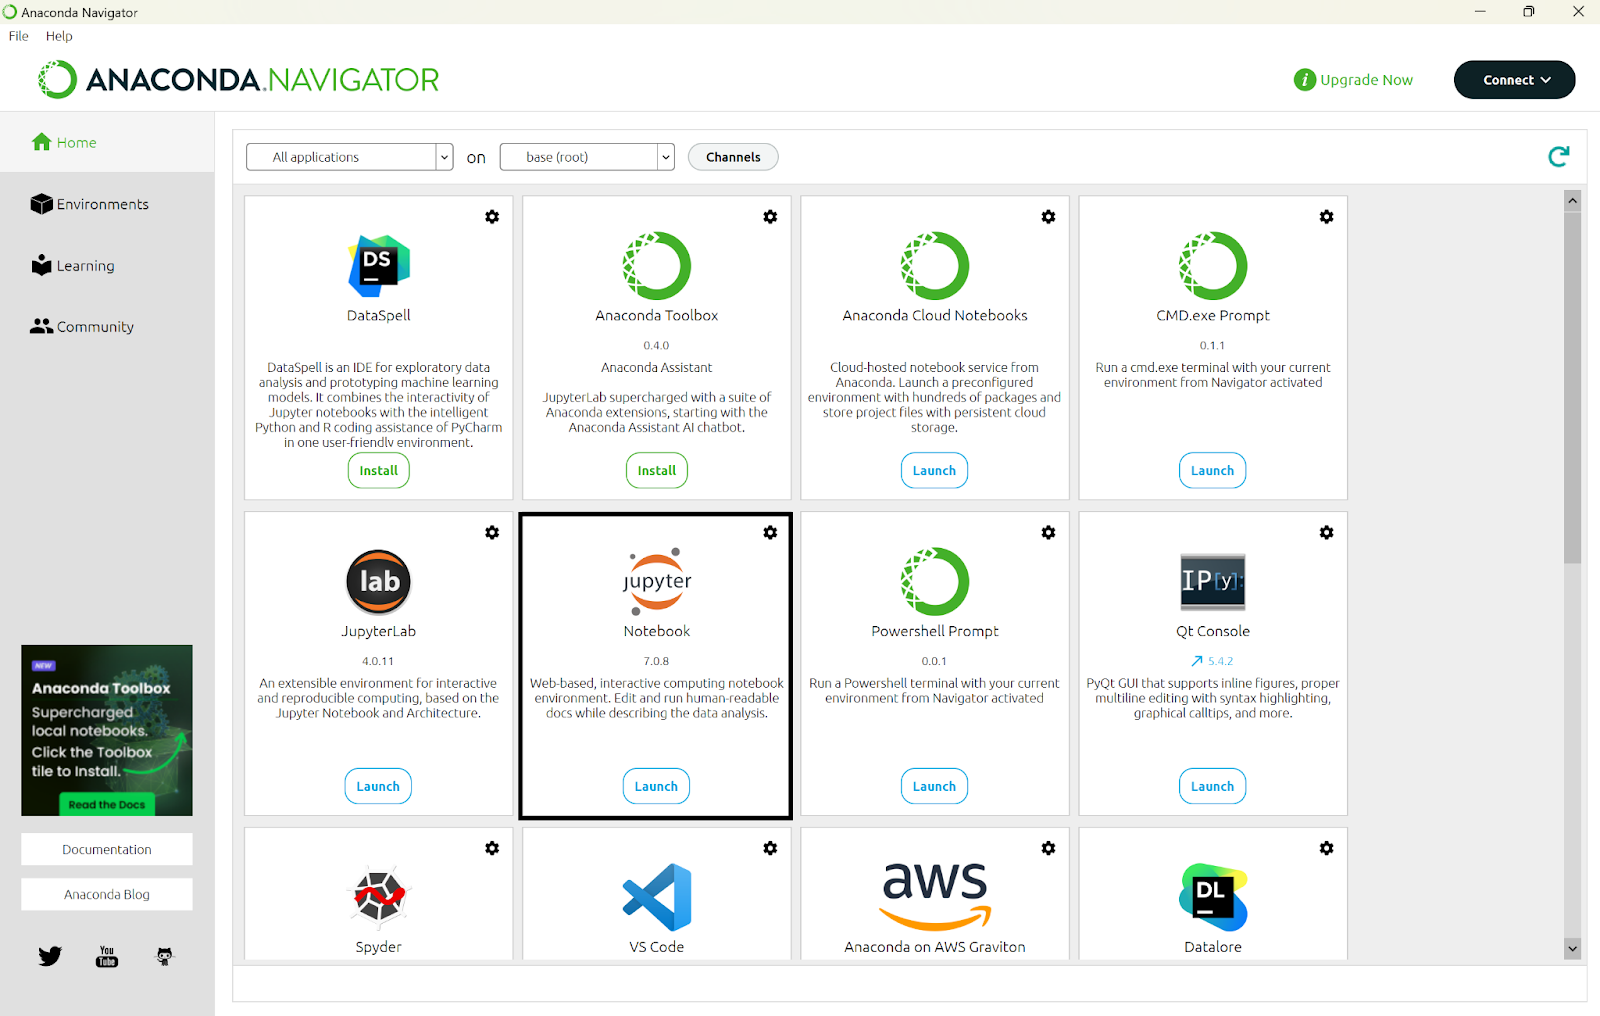
Jupyter Notebook will start in your default web browser, showing a list of your current folder's contents where you can create new notebooks or open existing ones.
Option 2: Installing with pip
If you already have Python installed and prefer not to use Anaconda, you can install Jupyter using pip, Python's package manager. This method is more flexible but might require additional configuration.
Ensure Python and pip are Installed:
Open your command line or terminal.
Check if Python is installed by typing python --version (or python3 --version on some systems). You should see the Python version if it's installed.
Check if pip is installed by typing pip --version (or pip3 --version). You should see the pip version to see if it's installed.
Install Jupyter Notebook:
In your terminal, type
pip install notebook(or pip3 install notebook for some systems) to install Jupyter Notebook.Wait for the installation to complete.
Launch Jupyter Notebook:
Type
jupyter notebookin your command line or terminal and press Enter.Jupyter Notebook will open in your default web browser.
Step 2: Create a New Notebook
Once Jupyter Notebook is running in your browser:
Navigate to the folder where you want to create your notebook.
Click on the "New" button at the top right corner of the interface.
Select "Python 3" or another available kernel to create a new notebook.
Step 3: Explore the Jupyter Notebook Interface
Cells: The notebook is made up of cells. Each cell can contain code, Markdown (for text), or raw text.
Running Cells: To run a cell, select it and press Shift + Enter. For code cells, this will execute the code. For Markdown cells, it will render the Markdown to formatted text.
Adding and Deleting Cells: Use the toolbar buttons to add, delete, and move cells.
There are primarily three types of cells you'll work with:
Code Cells: Contain code to be executed by the notebook's kernel.
Markdown Cells: Allow you to write formatted text using Markdown.
Raw Cells: Contain text that will not be formatted or executed.
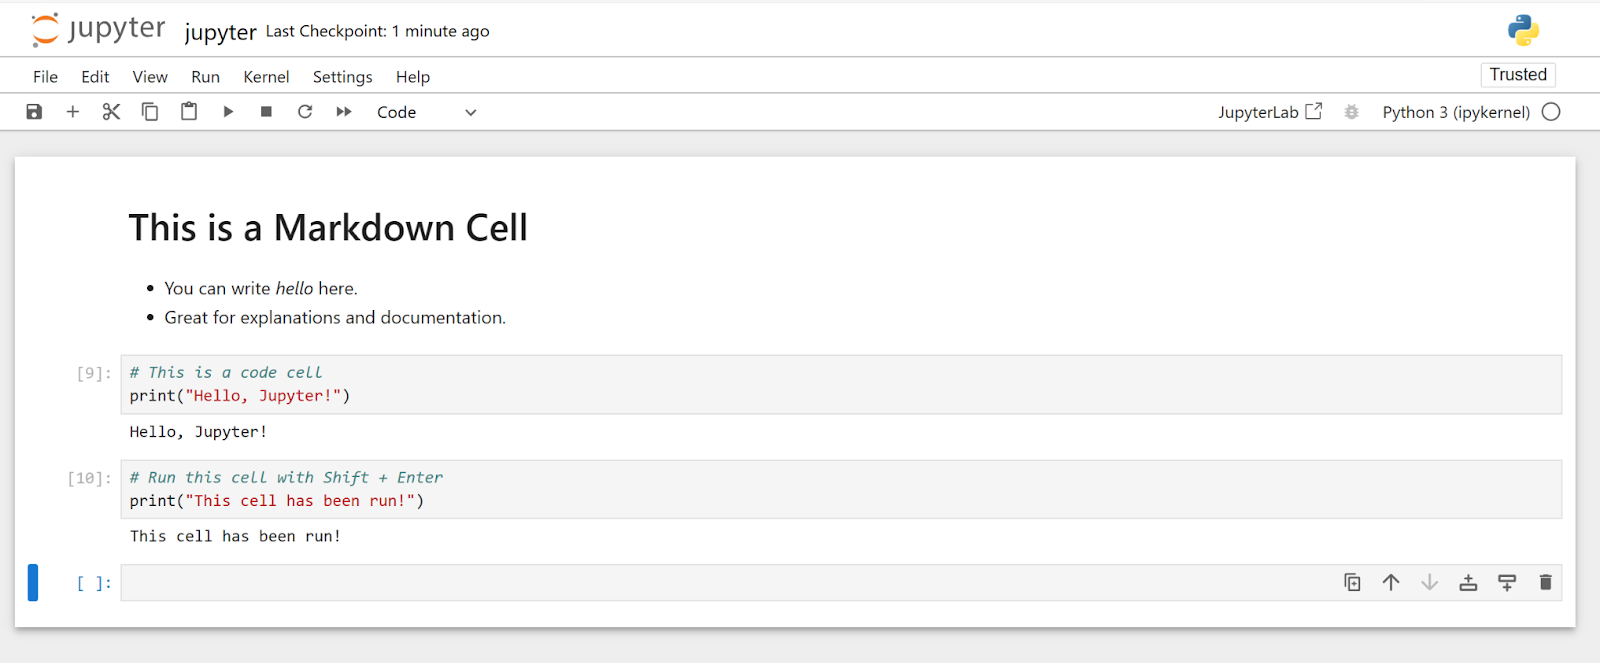
Example: Let's create a Markdown cell and a code cell.
Markdown Cell Example: In a new cell, switch its type to "Markdown," then input the following and press Shift + Enter to render it.
# This is a Markdown Cell
- You can write formatted text here.
- Great for explanations and documentation.
Code Cell Example: Make sure your cell is set to "Code," then input the following Python code and press Shift + Enter to execute it.
# This is a code cell
print("Hello, Jupyter!")
Running Cells: You have a few options to run a cell, but the most common is Shift + Enter, which executes the current cell and moves it to the next one. Let's try running a code cell.
# Run this cell with Shift + Enter
print("This cell has been run!")
Bonus: Adding and Deleting Cells
You can easily add new cells or delete existing ones using the Jupyter Notebook toolbar.
Adding a Cell: Click the "+" button on the toolbar to add a new cell below the selected one.
Deleting a Cell: Select the cell you wish to delete, then click the scissors button on the toolbar to remove it.
Step 4: Save and Share Your Notebook
Saving: Click on the floppy disk icon in the toolbar or go to "File > Save and Checkpoint" to save your work.
Sharing: Notebooks are saved as .ipynb files. You can share these files directly, use a version control system like Git, or convert them to other formats (like HTML or PDF) via the "File > Download as" menu.
Step 5: Shutting Down a Notebook
When you're finished working in a notebook:
Go to "File > Close and Halt" to shut it down.
Close the Jupyter Notebook browser tab.
To stop the Jupyter Notebook server, return to your terminal, press Ctrl + C, and confirm the shutdown.
Congratulations! You're now ready to use Jupyter Notebooks for your projects!
A Simple Example
Let's create a simple example to demonstrate the power of Jupyter Notebooks. We'll write a small piece of Python code to generate a plot of the sine function using Matplotlib, a popular plotting library.
First, let's write the code to generate our plot:
import matplotlib.pyplot as plt
import numpy as np
# Generate a range of numbers
x = np.linspace(0, 10, 100)
# Calculate the sine of each number
y = np.sin(x)
# Create a plot
plt.plot(x, y)
# Display the plot
plt.show()
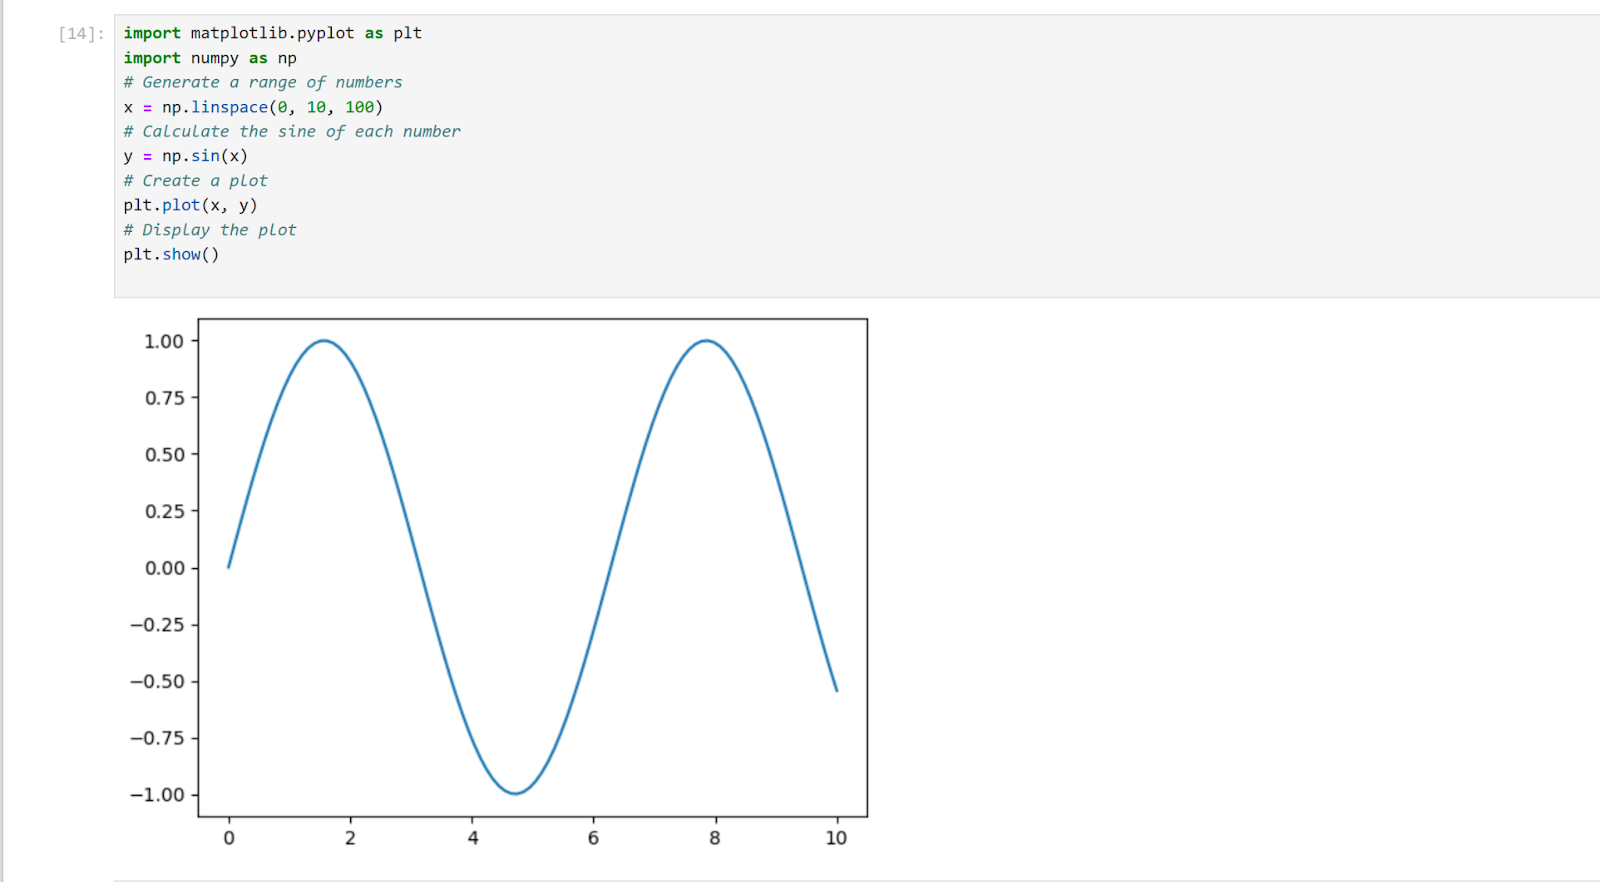
This code will generate a simple sine function graph illustrating using Jupyter Notebook for data visualization.
As demonstrated, the Jupyter Notebook environment allows us to seamlessly combine code execution with visualization, making it an incredibly powerful learning and professional development tool. By following the simple steps and example above, you can explore the vast possibilities of Jupyter Notebooks.
Whether you're analyzing data, developing machine learning models, or simply trying to learn a new programming language, Jupyter Notebooks provides a user-friendly interface that supports interactive learning and development. With its ability to integrate with a wide array of programming languages and data science tools, Jupyter Notebooks is a versatile platform that can cater to diverse needs.
To further enhance your Jupyter Notebook experience, consider exploring additional features such as:
Magic Commands: Special commands prefixed with a % or %% symbol, offering a range of functionalities from timing code execution to embedding visualizations directly within a notebook.
Extensions: The Jupyter community has developed numerous extensions that add functionalities like code folding, spell-checking, and enhanced visualizations.
Collaboration Tools: Platforms like JupyterHub and Google Colab allow multiple users to work on the same notebook simultaneously, making collaborative projects more manageable.
End Note
By incorporating Jupyter Notebooks into your workflow, you're gaining access to a powerful coding tool and joining a vibrant community of developers and researchers continually pushing the boundaries of what's possible in data science and beyond.
Happy coding!